In order to perform the integration every project will require CLU – Common Logic unit and Gate HTTP, that will connect it to the local Network. CLU holds a very efficient 32-bit processor, DDR3 memory, real time operating system, LUA interpreter, Z wave module, local bus controller, etc’. Gate HTTP module is required to integrate Grenton Smart Home with 3rd party devices and external systems, such as CoolAutomation devices, when they both connected to the same network. It allows to create an event based dependencies between the CLU and CoolAutomation products.
Seamless HVAC
integration by Grenton


Welcome to our step-by-step guide on integrating Grenton Home Automation equipment with HVAC systems using CoolAutomation devices.
Choose your HVAC System
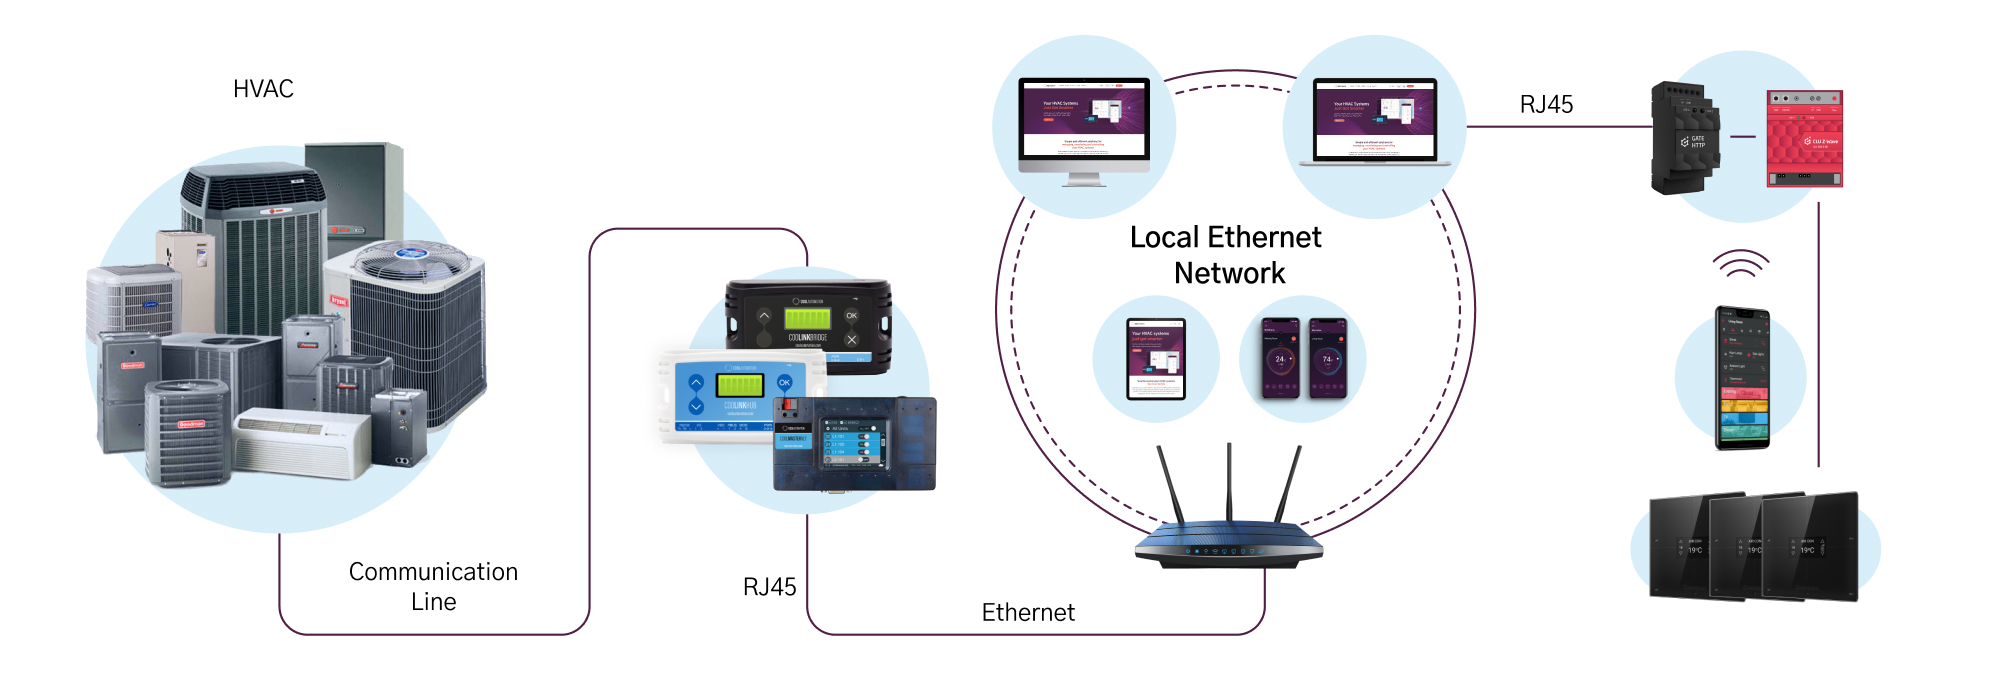
VRF
Inverter Split / Multi Split
Legacy / Traditional
Other
VRF
Ideal for high-end residential and light commercial applications. With a single outdoor unit and multiple interconnected indoor units, VRF systems provide enhanced flexibility, zoning capabilities, energy efficiency, and precise climate control.
 Need help? Contact us for assistance
CoolAutomation integration device
CoolMaster Product Line
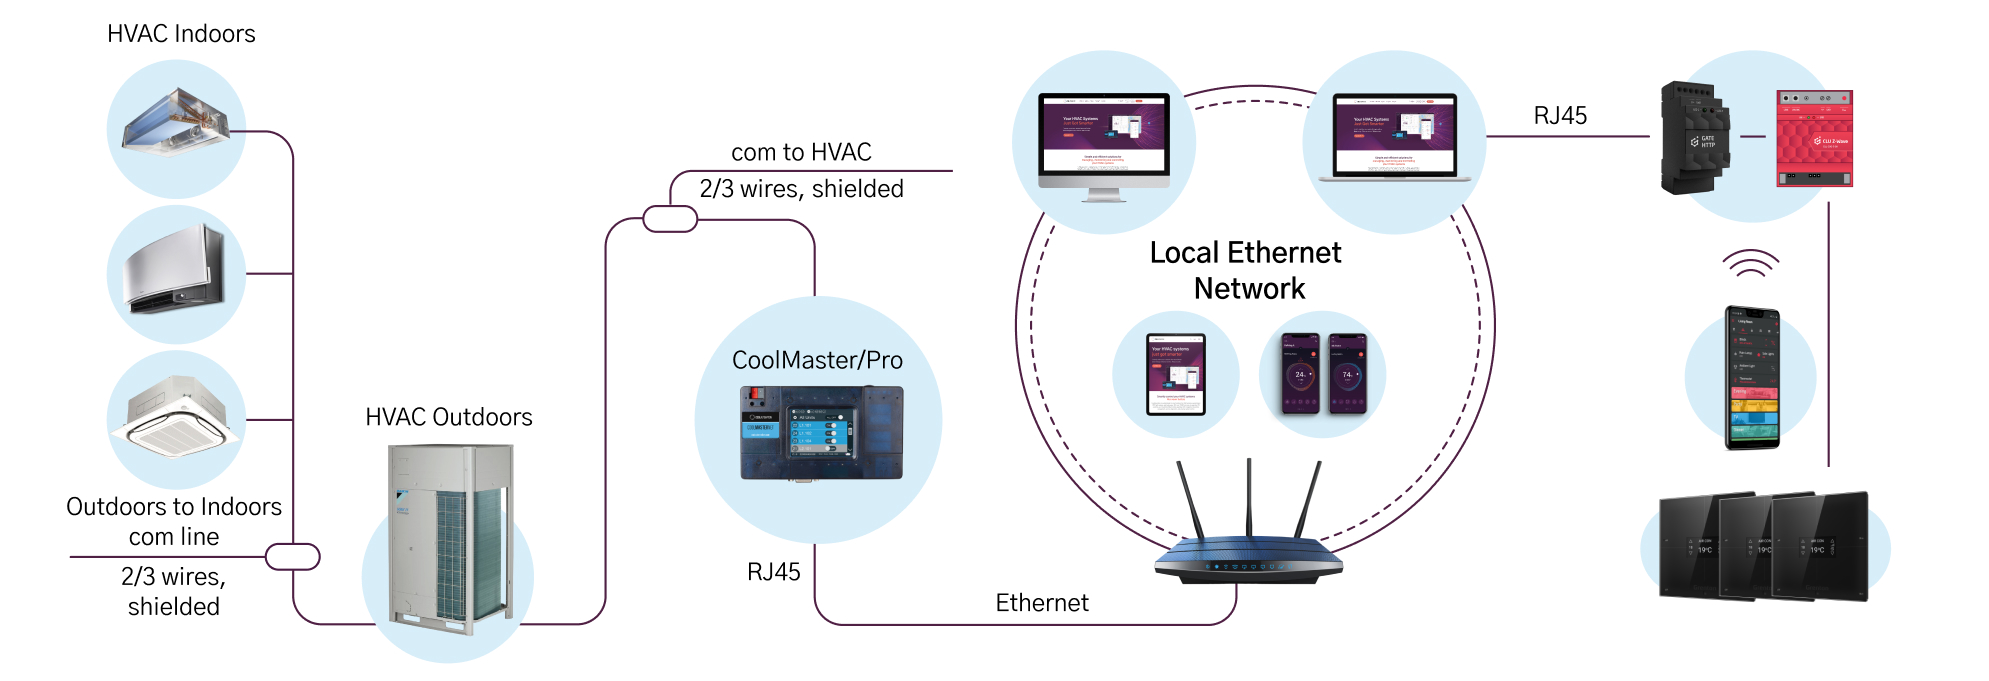
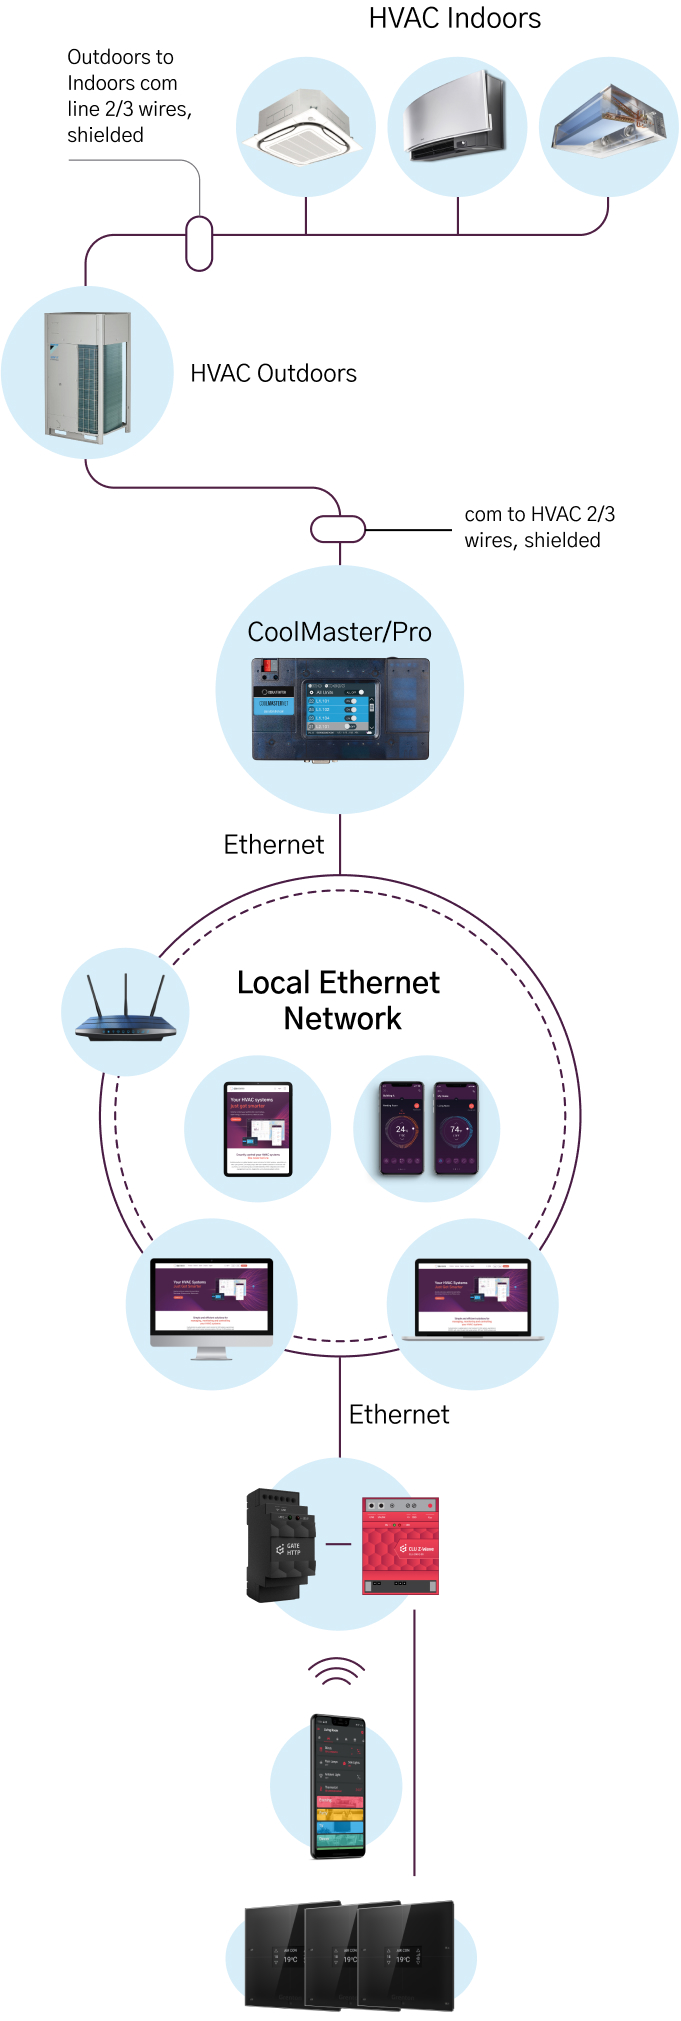
CoolMaster devices can seamlessly connect to the central communication of your VRF HVAC system. It automatically detects all the connected indoor units (zones) and seamlessly integrates them with the Home automation software.
CoolMaster Product Line

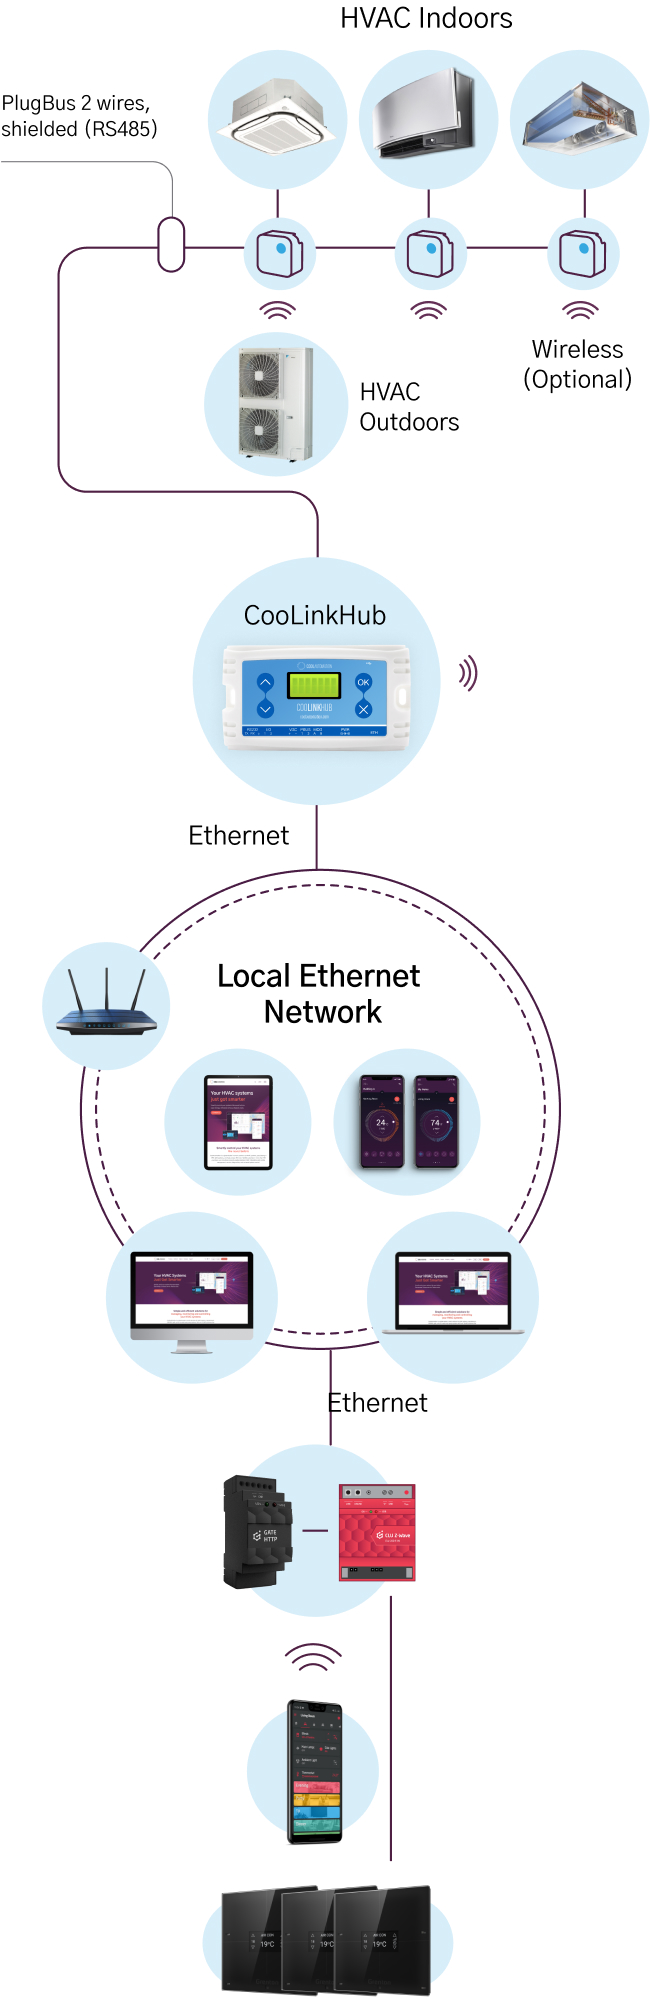
CoolPlug and CooLinkHub

CooLinkBridge
Connectivity and Wiring
Grenton Software Configuration
Complete the setup process by selecting the required equipment from Grenton Line up and configuration in the Object Manager software.
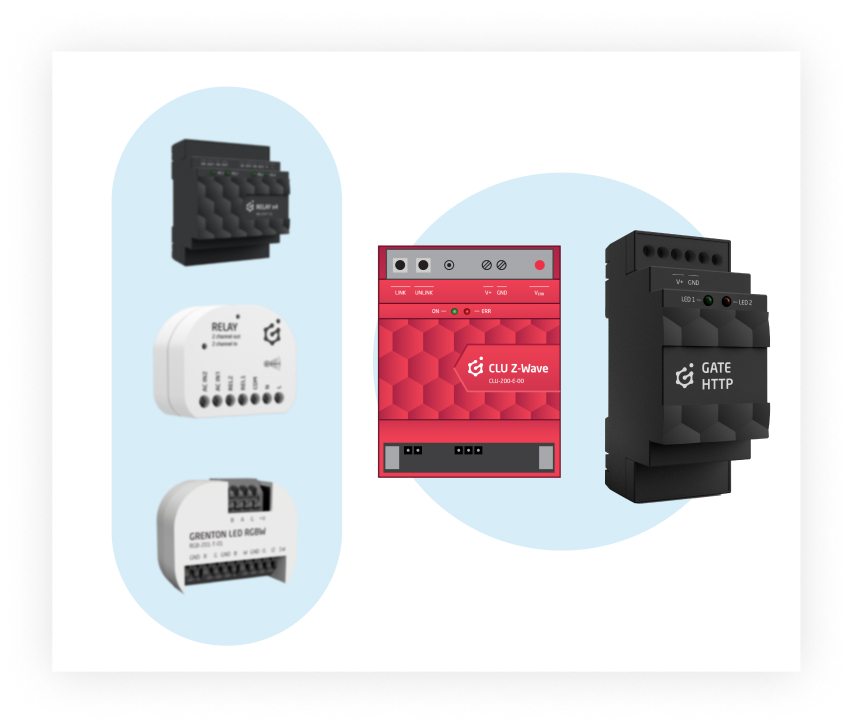
A. Required Components: CLU and Gate HTTP
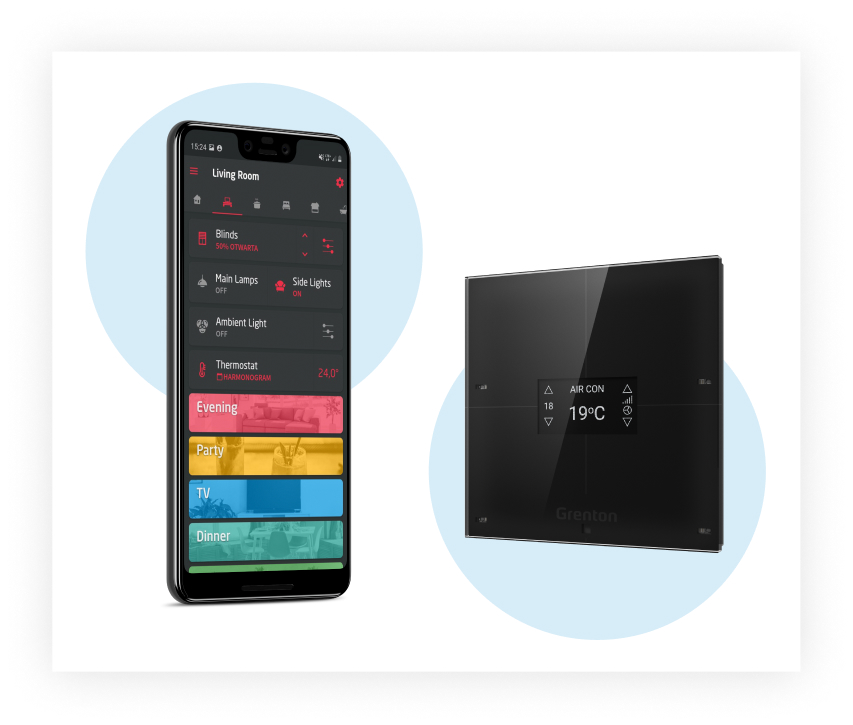
B. Visualization Components for HVAC System Control
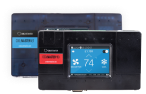
The control of the HVAC on Grenton is done either through the widget, on smartphones, or through a range of smart panels. Smart panels are equipped with powerful OLED displays and can be programmed to control HVAC, They include a built in proximity, lighting and temperature sensor, that can be incorporated in wiser controlling of zone’s comfort. Each panel can be programmed to control a single, or multiple zones.

C. Configuration in the Accelerator Software
- Use Grent Object manager to design and configure the project.
- Choose CoolAutomation products from the objects list.
- Select all the detected UID’s as HVAC zones.
- Set up the right IP for CoolAutomation device.
- Link the smart panels to the associated zones or setup the widget for HVAC control to complete the process.
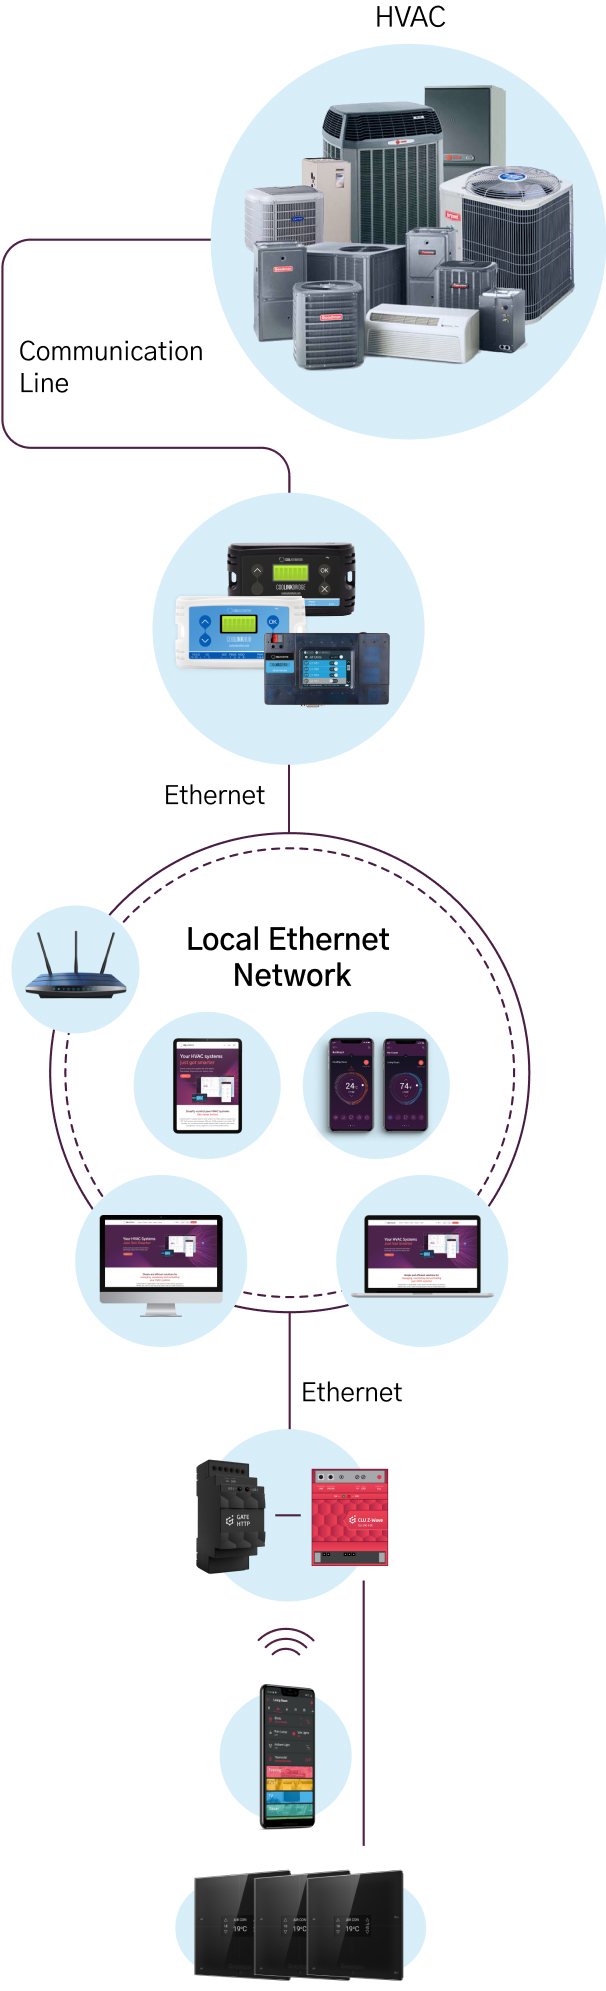
Inverter Split / Multi Split
These systems are compact residential HVAC units consisting of one or multiple air handlers and a single outdoor unit, featuring an inverter compressor. Common brands include Daikin, Mitsubishi Electric, Fujitsu, and more.
Need help? Contact us for assistanceCoolAutomation integration device
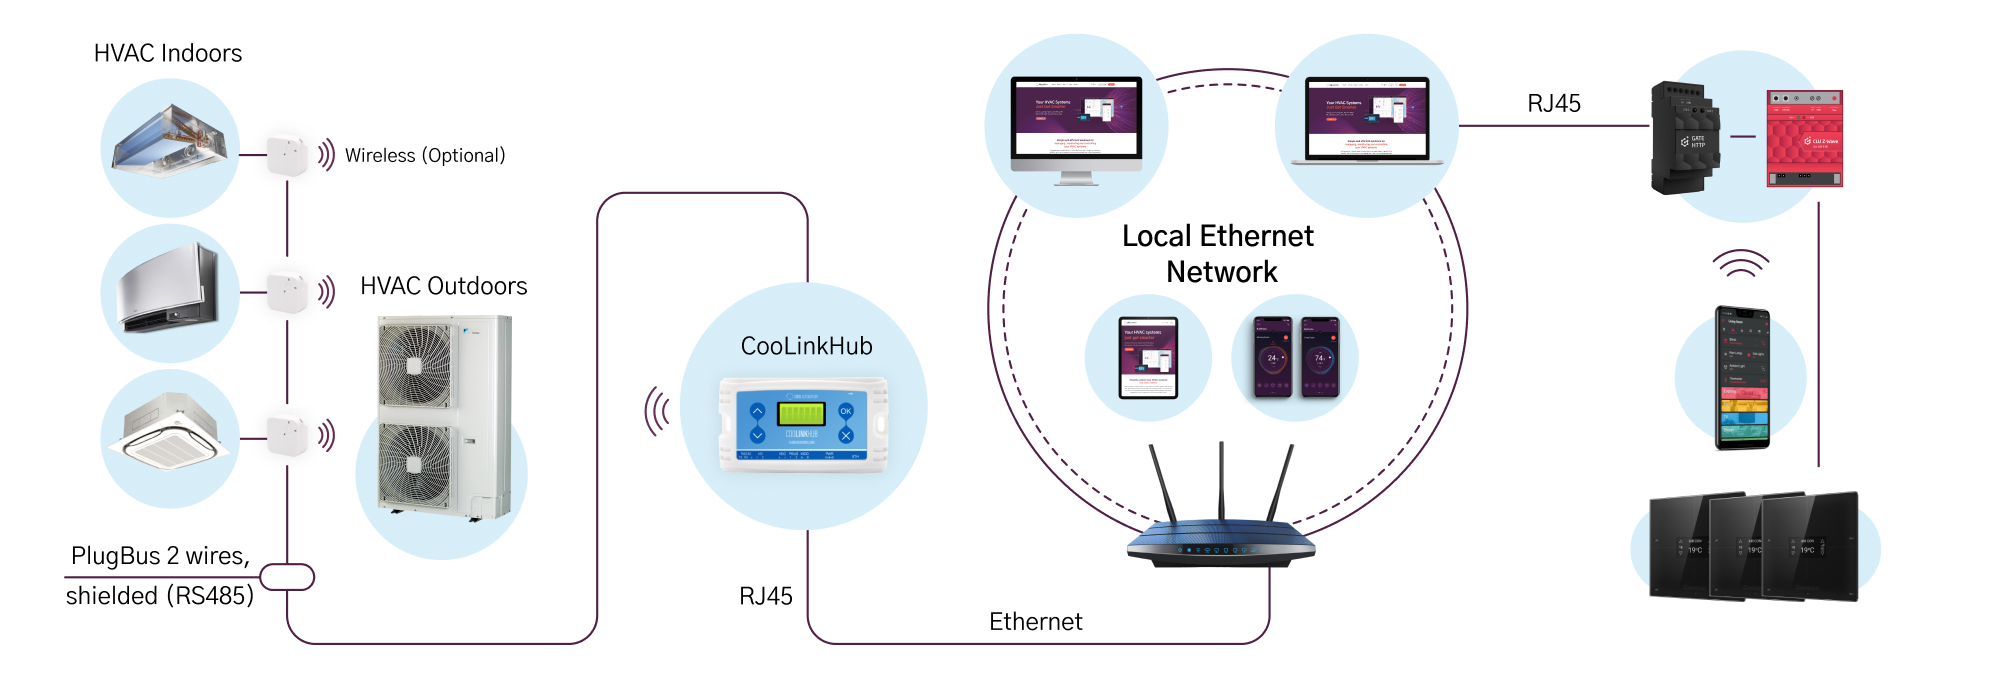
CoolPlug & CooLinkHub
CoolPlug is attached to each indoor unit, while the CooLinkHub serves as the central hub, capable of accommodating up to 10 CoolPlugs. Communication between these two parts can be established either through wired or wireless connectivity options.
CoolMaster Product Line
CoolPlug and CooLinkHub
CooLinkBridge
Connectivity and Wiring
Grenton Software Configuration
Complete the setup process by selecting the required equipment from Grenton Line up and configuration in the Object Manager software.
A. Required Components: CLU and Gate HTTP
In order to perform the integration every project will require CLU – Common Logic unit and Gate HTTP, that will connect it to the local Network. CLU holds a very efficient 32-bit processor, DDR3 memory, real time operating system, LUA interpreter, Z wave module, local bus controller, etc’. Gate HTTP module is required to integrate Grenton Smart Home with 3rd party devices and external systems, such as CoolAutomation devices, when they both connected to the same network. It allows to create an event based dependencies between the CLU and CoolAutomation products.
B. Visualization Components for HVAC System Control
The control of the HVAC on Grenton is done either through the widget, on smartphones, or through a range of smart panels. Smart panels are equipped with powerful OLED displays and can be programmed to control HVAC, They include a built in proximity, lighting and temperature sensor, that can be incorporated in wiser controlling of zone’s comfort. Each panel can be programmed to control a single, or multiple zones.
C. Configuration in the Accelerator Software
- Use Grent Object manager to design and configure the project.
- Choose CoolAutomation products from the objects list.
- Select all the detected UID’s as HVAC zones.
- Set up the right IP for CoolAutomation device.
- Link the smart panels to the associated zones or setup the widget for HVAC control to complete the process.
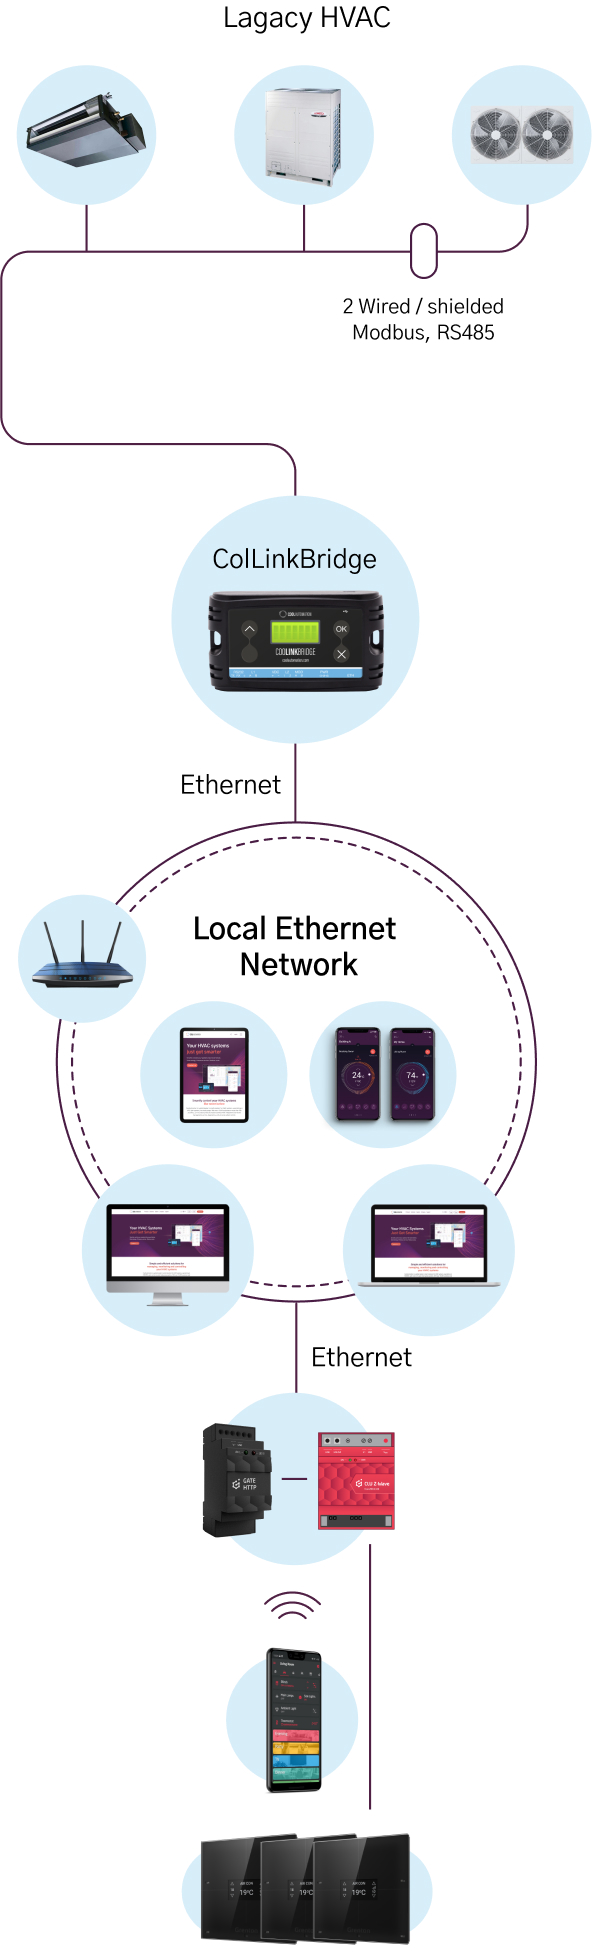
Legacy / Traditional
The standard units commonly found in North and South American markets. These systems are powered by 24V relays and can be controlled using a standard 24V, 5-wire thermostat. Widely used and known for their reliability in residential and commercial sites.
Need help? Contact us for assistanceCoolAutomation integration device
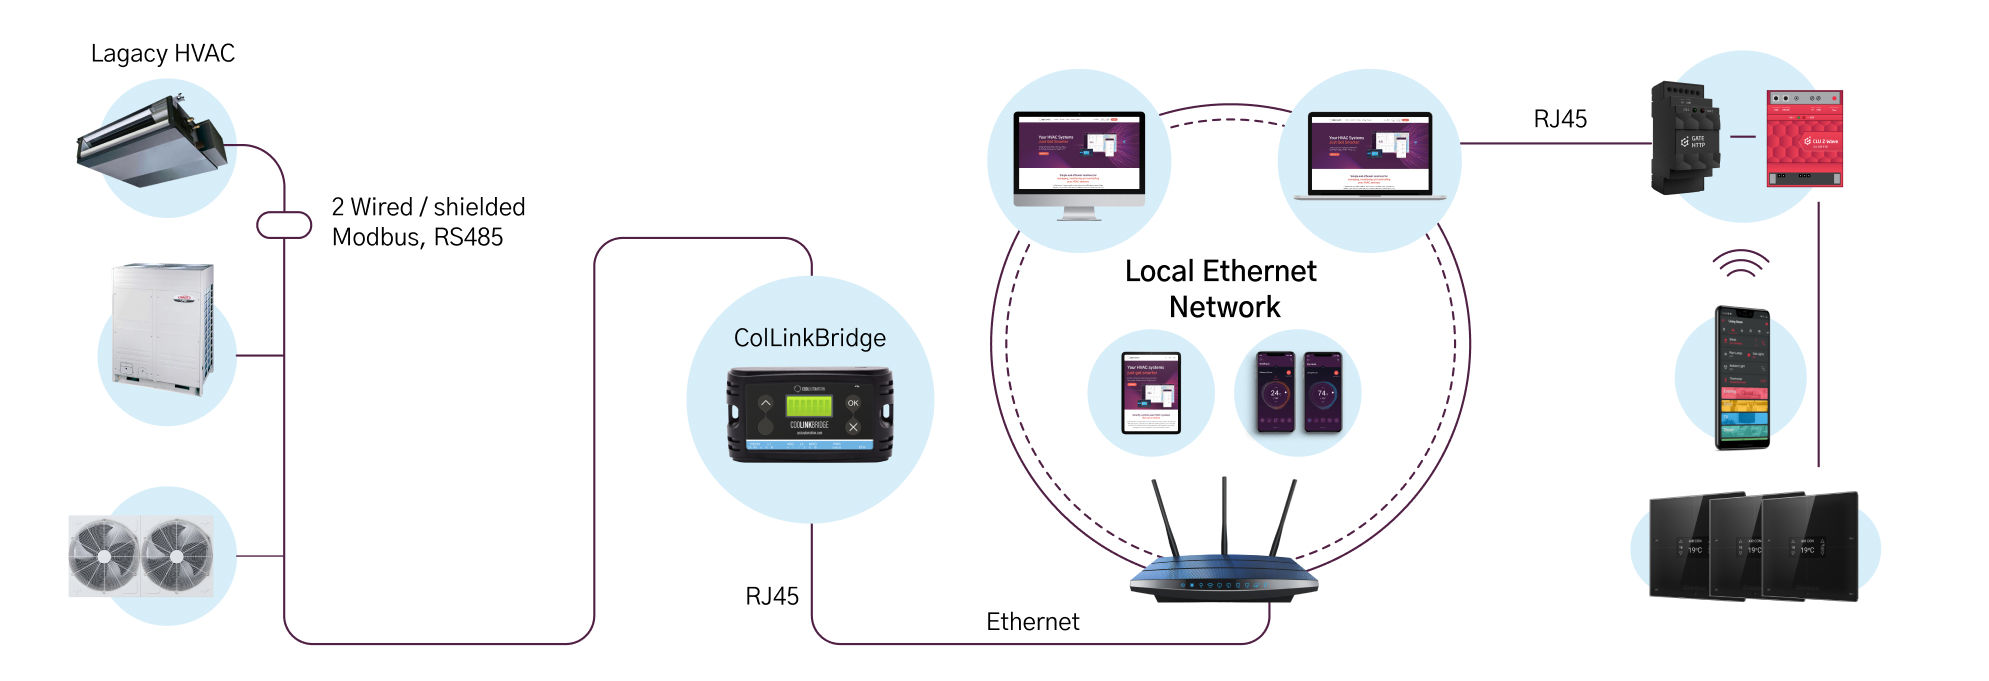
CooLinkBridge
CooLinkBridge is designed to seamlessly integrate with various types of HVAC equipment, including communicating systems, underfloor heating Traditional legacy HVAC units in conjunction with thermostats, fan coil units, heat pump air to water systems, and more.
CoolMaster Product Line
CoolPlug and CooLinkHub
CooLinkBridge
Connectivity and Wiring
Grenton Software Configuration
Complete the setup process by selecting the required equipment from Grenton Line up and configuration in the Object Manager software.
A. Required Components: CLU and Gate HTTP
In order to perform the integration every project will require CLU – Common Logic unit and Gate HTTP, that will connect it to the local Network. CLU holds a very efficient 32-bit processor, DDR3 memory, real time operating system, LUA interpreter, Z wave module, local bus controller, etc’. Gate HTTP module is required to integrate Grenton Smart Home with 3rd party devices and external systems, such as CoolAutomation devices, when they both connected to the same network. It allows to create an event based dependencies between the CLU and CoolAutomation products.
B. Visualization Components for HVAC System Control
The control of the HVAC on Grenton is done either through the widget, on smartphones, or through a range of smart panels. Smart panels are equipped with powerful OLED displays and can be programmed to control HVAC, They include a built in proximity, lighting and temperature sensor, that can be incorporated in wiser controlling of zone’s comfort. Each panel can be programmed to control a single, or multiple zones.
C. Configuration in the Accelerator Software
- Use Grent Object manager to design and configure the project.
- Choose CoolAutomation products from the objects list.
- Select all the detected UID’s as HVAC zones.
- Set up the right IP for CoolAutomation device.
- Link the smart panels to the associated zones or setup the widget for HVAC control to complete the process.
Other
If your HVAC system doesn't fall into any of the d categories, don't worry! We may still have a solution for you. Simply reach out to us with the specific brand and models of your HVAC system, and our experts will be happy to assist you.
Need help? Contact us for assistanceCoolAutomation integration device
Need help? Contact us for assistanceConnectivity and Wiring
Grenton Software Configuration
Complete the setup process by selecting the required equipment from Grenton Line up and configuration in the Object Manager software.
A. Required Components: CLU and Gate HTTP
In order to perform the integration every project will require CLU – Common Logic unit and Gate HTTP, that will connect it to the local Network. CLU holds a very efficient 32-bit processor, DDR3 memory, real time operating system, LUA interpreter, Z wave module, local bus controller, etc’. Gate HTTP module is required to integrate Grenton Smart Home with 3rd party devices and external systems, such as CoolAutomation devices, when they both connected to the same network. It allows to create an event based dependencies between the CLU and CoolAutomation products.
B. Visualization Components for HVAC System Control
The control of the HVAC on Grenton is done either through the widget, on smartphones, or through a range of smart panels. Smart panels are equipped with powerful OLED displays and can be programmed to control HVAC, They include a built in proximity, lighting and temperature sensor, that can be incorporated in wiser controlling of zone’s comfort. Each panel can be programmed to control a single, or multiple zones.
C. Configuration in the Accelerator Software
- Use Grent Object manager to design and configure the project.
- Choose CoolAutomation products from the objects list.
- Select all the detected UID’s as HVAC zones.
- Set up the right IP for CoolAutomation device.
- Link the smart panels to the associated zones or setup the widget for HVAC control to complete the process.


